The documentation for GFS2 is woefully insufficient and this article aims to document some useful commands and also troubleshooting means. We are using CentOS / Redhat so the information more for CentOS/RHEL.
If you have setup GFS2 to be shared before across a number of servers and then for whatever reason the GFS2 cluster crashes; the following steps are used for recovery.
we should run the following commands:-
service pacemaker start
service corosync start
crm_mon start
After executing crm_mon the server will search for the servers in the cluster and it will not do anything until it finds all of the servers in the cluster.
There is an additional command which may needed to get the cluster going which is:-
clvmd start
A lot of the resources online will say that you should use service clvmd start – but for some reason our setup does not require that and we use clvmd start instead.
Useful Commands
pcs status
and
pcs cluster status
The above command will show the current status of the cluster
Corosync Example
CoroSync’s config file is here:-
/etc/corosync/corosync.conf
An example config:-
totem {

version: 2

secauth: off

cluster_name: odgcluster

transport: udpu

}
nodelist {
node {
ring0_addr: odweb1
nodeid: 1
}
node {
ring0_addr: odweb2
nodeid: 2
}
node {
ring0_addr: odweb3
nodeid: 2
}
node {
ring0_addr: odadmin
nodeid: 4
}
}
quorum {
provider: corosync_votequorum
}
logging {
to_logfile: yes
logfile: /var/log/cluster/corosync.log
to_syslog: yes
}
totem {
version: 2
secauth: off
cluster_name: odgcluster
transport: udpu
}
nodelist {
node {
ring0_addr: odweb1
nodeid: 1
}
node {
ring0_addr: odweb2
nodeid: 2
}
node {
ring0_addr: odweb3
nodeid: 2
}
node {
ring0_addr: odadmin
nodeid: 4
}
}
quorum {
provider: corosync_votequorum
}
logging {
to_logfile: yes
logfile: /var/log/cluster/corosync.log
to_syslog: yes
}
Troubleshooting
If you run crm_mon start and get problems like this:-
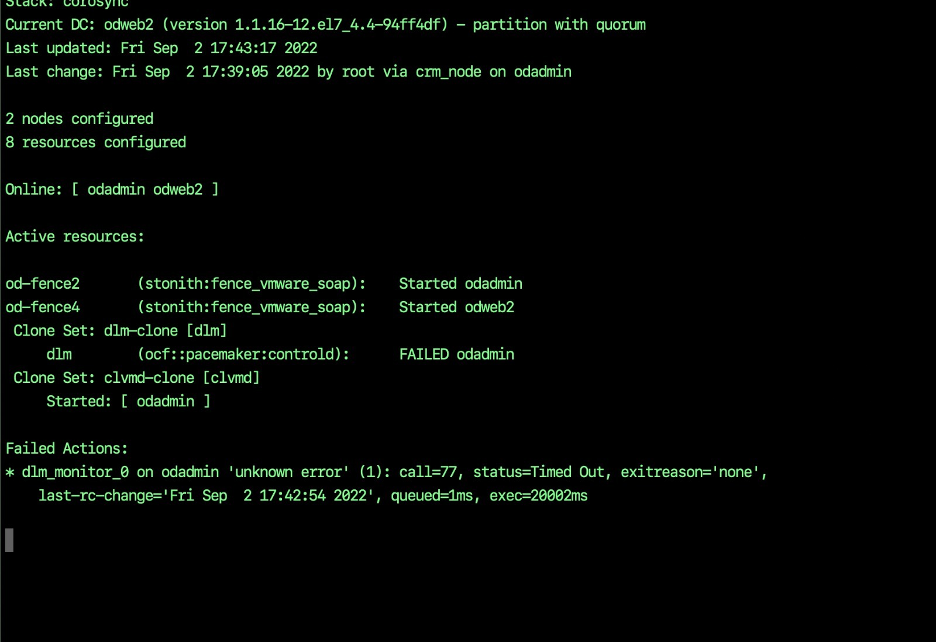
dlm_monitor_0 on xxxx ‘unknown error’
You can try this:-
crm_resource -P
Location of GFS config file, each node will contain the configuration in the following file:-
/var/lib/pacemaker/cib/cib.xml – Location of pacemaker config file
However it cannot be edited directly.
This document is quite useful:-
https://clusterlabs.org/pacemaker/doc/deprecated/en-US/Pacemaker/2.0/html/Pacemaker_Administration/s-cibadmin.html
To make edits this is how to do it:-
cibadmin --replace --xml-file tmp.xml

vi tmp.xml

cibadmin --replace --xml-file tmp.xml
If you get the problem like this:-
Call cib_replace failed (-205): Update was older than existing configuration
Then you need to increase the number epoch=”xxx” in the XML to a higher number.
DO NOT TRY TO EDIT THE XML FILE DIRECTLY AS ALL CHANGES WILL BE OVERWRITTE
<nodes>
<node id=”1″ uname=”odweb1″/>
<node id=”2″ uname=”odweb2″/>
<node id=”3″ uname=”odweb3″/>
<node id=”4″ uname=”odadmin”/>
</nodes>
Need to use:-
cibadmin –delete –xml-text ‘<primitive class=”stonith” id=”od-fence3″ type=”fence_vmware_soap”>’
And then the fencing
<primitive class=”stonith” id=”od-fence3″ type=”fence_vmware_soap”>
<instance_attributes id=”od-fence3-instance_attributes”>
<nvpair id=”od-fence3-instance_attributes-action” name=”action” value=”reboot”/>
<nvpair id=”od-fence3-instance_attributes-inet4_only” name=”inet4_only” value=”1″/>
<nvpair id=”od-fence3-instance_attributes-ipaddr” name=”ipaddr” value=”192.168.10.100″/>
<nvpair id=”od-fence3-instance_attributes-ipport” name=”ipport” value=”443″/>
<nvpair id=”od-fence3-instance_attributes-login” name=”login” value=”fenuser”/>
<nvpair id=”od-fence3-instance_attributes-passwd” name=”passwd” value=”fu#a9b8#”/>
<nvpair id=”od-fence3-instance_attributes-pcmk_host_check” name=”pcmk_host_check” value=”static-list”/>
<nvpair id=”od-fence3-instance_attributes-pcmk_host_list” name=”pcmk_host_list” value=”odweb3″/>
<nvpair id=”od-fence3-instance_attributes-pcmk_host_map” name=”pcmk_host_map” value=”odweb3:odweb3″/>
<nvpair id=”od-fence3-instance_attributes-power_wait” name=”power_wait” value=”3″/>
<nvpair id=”od-fence3-instance_attributes-ssl_insecure” name=”ssl_insecure” value=”1″/>
</instance_attributes>
<operations>
<op id=”od-fence3-monitor-interval-120s” interval=”120s” name=”monitor”/>
</operations>
</primitive>
To take out nodes or add nodes use the following command:-
## Important command to run otherwise pcs status will always show the node that you don’t want there
crm_node -R odweb3 –force
##Useful Command
service dlm status -l
if the following is there then you need to reboot this server:-
Sep 02 17:52:24 odadmin dlm_controld[12823]: 5824 dlm_controld 4.0.7 started
Sep 02 17:52:24 odadmin dlm_controld[12823]: 5824 found uncontrolled lockspace gfs
Sep 02 17:52:24 odadmin dlm_controld[12823]: 5824 found uncontrolled lockspace clvmd
Sep 02 17:52:24 odadmin dlm_controld[12823]: 5824 tell corosync to remove nodeid 4 from cluster
/var/lib/pcsd/tokens
This error:-
“tell corosync to remove nodeid”
Can often be resolved by rebooting the node.